
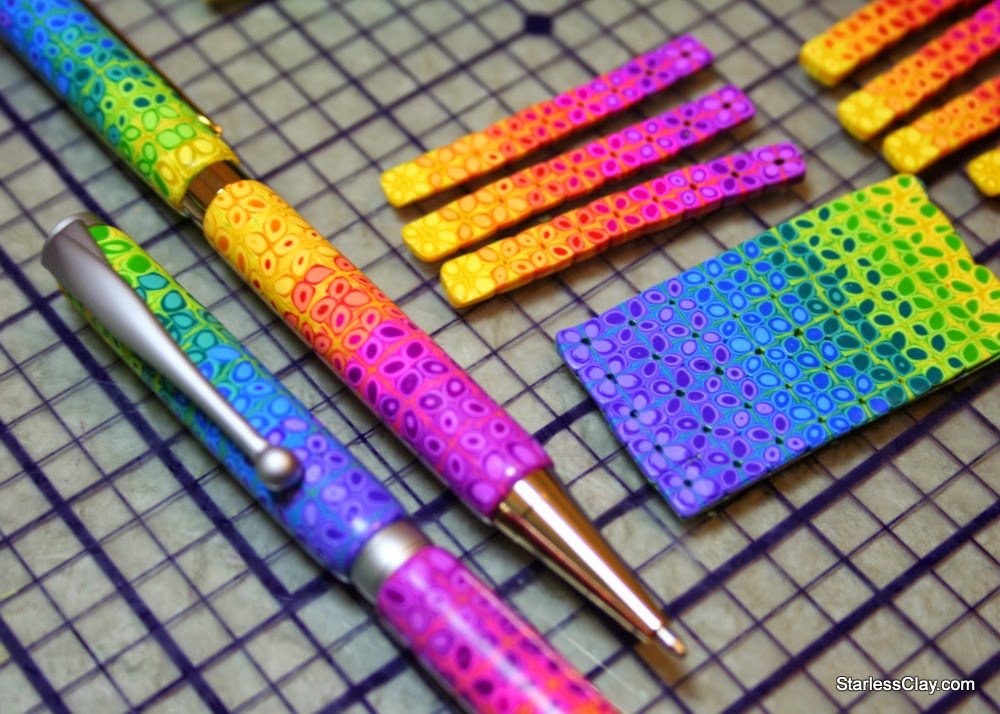
Make colorful pens with this easy extruded cane technique!
When this tutorial popped up on my Pinterest feed, I knew right away that I had to try it and I ordered a set of ClayCore adapters that night. After a few experiments I figured out how to cover pens with the cane and came up with a bright rainbow palette that's perfect for spring flowers.
EDIT 7/6/13 The recipe for "Green" has been corrected. I apologize for any confusion!
EDIT 7/6/13 The recipe for "Green" has been corrected. I apologize for any confusion!
You will need the following tools and materials:
Pasta machine
One 2-oz block each of Premo! clay in Fuchsia, Zinc Yellow, Cobalt and White
Slimline pen kit, or any pen/pencil kit with 2” long, 7mm diameter tubes
Tissue blade
Craft knife
Ruler

To make the neon rainbow colors, start by adding a little bit of white to your fuchsia- about 1 part of 32. This will prevent it from darkening too much during baking. Roll
2 mm (5-6 playing card) thick sheets of Cobalt, Zinc Yellow and the
lightened Fuchsia and punch out squares with your Kemper cutter. Use
them to mix the following colors:

Purple: 21 squares fuchsia, 3 squares cobalt
Fuchsia: 16 squares fuchsia
Red Orange: 8 fuchsia, 8 zinc yellow
Yellow Orange: 14 zinc yellow, 2 fuchsia
Yellow: 31 1/2 zinc yellow, 1/2 fuchsia
Yellow Green: 15 zinc yellow, 1 cobalt
Green: 12 cobalt, 4 zinc yellow
Blue: 16 cobalt
Violet: 12 cobalt, 12 fuchsia
Roll each color into a 2.5 mm (7-8 playing card) thick sheet. Use the end of your clay extruder to punch out three discs each of purple and violet (or first and last colors), four discs of yellow or the fifth/middle color, and two of each remaining color. Mix the remainder of each color with an equal amount of white clay and punch out the same number of discs from each pastel color.

Starting
with dark, alternate stacking the dark and light versions of your first
color, then the second, third, fourth, and half of the fifth color to
form a log. Repeat to make the second log. Yellow (fifth color) should
appear at the end of both logs. Roll each log to smooth it and reduce the diameter until it easily fits into the barrel of the extruder.


Extrude the log and trim off the yellow end until it starts to look nice. Measure the extruded cane and divide that number by nine to figure out how long to cut each piece. My cane was 16” long so I cut it into nine 1 ¾” pieces, but I do recommend actually taking the measurement and doing the math as your results may vary depending on the exact thickness of the clay sheets you started with.
You’ve
probably noticed that a small hole is running through the cane- you can
start to close that by reducing the cane pieces a little. Arrange the
nine pieces near each other without touching and flatten them just a
little bit with a brayer or roller so that each is now slightly
rectangular. Rotate each piece and carefully stick them together, in
order, to form the final cane. Roll over it from end to end to flatten
the pieces back into squares.

Repeat to make the other cane and let them rest for a few hours.

Roll a sheet of scrap clay on your thinnest setting. Cut five thin slices from one of your canes and carefully line them up on the sheet. Shave the surface with a sharp tissue blade until it feels even and smooth.

Closely trim the long edges with a craft knife, angling it inward to make a slightly beveled cut. The short edges don’t need to be cut as carefully.

Wrap the trimmed sheet around one of the brass tubes from your pen kit, matching up the edges as neatly as you can. It’s fine if the sheet doesn’t quite reach the ends of the tube. Roll the tube on your work surface to smooth and even out the clay layer, then trim off the excess at the ends.

Thread the finished tubes onto a skewer, smooth out any fingerprints, and bake as directed. Sand and seal the tubes, assemble your pens and enjoy!

You can also buy finished pens and pencils from my Etsy shop!

This tutorial is available in PDF format at Poly Clay Play, and it's free with the purchase of a ClayCore Adapter set!
Hillarious! Great! There are not enough superb words to describe this tutorial! :) Thank you soooo much for it! This was my first time mixing colors, and it went so well with your exact recipes. Very nice rainbow colors. :) Many thanks, and best wishes for your crafting! :)
ReplyDeletewow this is very clever!!:D
ReplyDeleteThanks so much for including your color recipes! Your colors are just gorgeous!
ReplyDeleteGreat work! I love it!
ReplyDeletelooks fab
ReplyDeleteI love your colours !
ReplyDeletesplendid ! Thanks a lot !
ReplyDeleteThanks everyone! :)
ReplyDeleteVery nicely done! I sure love the colors! Yum!
ReplyDeleteThanks!
DeleteVery well done tutorial and the results are beautiful---I can see you are a clayer to follow!
ReplyDeleteThank you!
DeleteNice to revisit this, Amber :) Featured on Polymer Arts today:
ReplyDeletehttp://www.thepolymerarts.com/blog/retro-rainbow/
Thank you so much for letting me know!
DeleteThank you so much for sharing!
ReplyDeleteI forgot to let you know that I did a variation of this using Kato colors and posted on my blog. Here is the link: http://2goodclaymates.blogspot.ca/2014/04/extruder-cane-designs-using-kato-clay.html
ReplyDeleteWow, I love your bright colors!! Thanks for letting me know :)
Deletelove it, it's fabulous. Going to try it out:)
ReplyDeleteI needed to create a mezuzzah for a girl who will become a Bat Mitzvah. I wanted it to be feminine, bright and appealing to a 13 year old girl. This cane proved to be just perfect. Thank you!
ReplyDeleteI marvel at your color mixing recipes. How do you do that?